
Python Feature Flags & Toggles: A Step-by-Step Setup Guide


In this article we're going to learn how to implement feature flags in a Python web framework. We're using a basic Flask application in this example, however, this guide could equally be used for any, including Django or Fast API.
Before we get started with the implementation of the Python feature flags, let’s talk a little bit about the benefits of feature flagging and Flagsmith.
What is a feature flag?
A feature flag is a software development technique that lets developers wrap a feature in a flag and just push the code. Developers use feature flags to turn feature functionality on and off (often for specific groups of users) without needing to deploy new code or wait for a scheduled release.
Let's say you're writing code and want to push your feature but can't because there's a dependency on another team or another platform. This depency blocks you and often ends up pushing the release if there are issues. Instead of getting blocked, you can wrap your feature in a flag.
Then, when the work you're waiting on is ready, you can enable it, often using feature flag tools. You're able to decouple deploy from release and push your code with confidence.
What is a flag in Python?
Given that they're so useful, it's no surprise that feature flags get a lot of use from Python developers.
In Python, a flag acts as a variable that controls which parts of your code are executed—think of it as a conditional switch for your application's behaviour. In its simplest form, it's a boolean value: True or False. When a flag is True, a block of code runs, and when it's False, it doesn't.
In practice, Python feature flags are far more useful than a hardcoded if statement buried somewhere in your codebase. Proper feature flag configuration enables you to toggle features dynamically, without touching your code or redeploying your Python app.
For the 51% of developers that use Python, making it the third most popular coding language, feature flags are a vital tool to test features and control access.

Why use feature flags?
Feature flags allow you to control your application remotely to release new features with confidence.
At a very basic use case, you can use them to show/hide new features (which is the use case we will mostly consider). However, they can become very powerful, allowing you to run phased rollouts and slowly show new features to a percentage of your users, or show certain features only to a subset—or segment—of users. Feature flags can also be used to store remote configuration data for your application such as JSON or XML data.
To get the most out of your feature flags (and avoid things like technical debt) try following our feature flag best practices.
Implementating feature toggles in Python
For the rest of this article, I will assume a basic knowledge level of Python and web development.
Let’s get started with our implementation. At the end of this tutorial, we will have an API that allows us to manage an inventory of computer games with a Python feature toggle. This lets us control the inventory, sort the game order, and change the way users are exposed to the games and application features using Python feature flags.
If you want to skip ahead to a particular step, you can grab the code my GitHub. Each of the commits is labelled in line with the steps below.
Step 1. Creating our Flask app
Firstly, let’s set up our Flask environment. We’ll use a virtual environment to manage our dependencies.
Now, let’s write some code. In a `main.py` file, let’s initialize our Flask application and add a basic endpoint to list some dummy computer games we’ll add to our inventory.
Now, if you browse to http://127.0.0.1:5000/games you should see the list of games returned.
Step 2. Adding Flagsmith
To be able to use Flagsmith in our Python application, we need to initialize the Flagsmith Python SDK. Let’s add the Flagsmith SDK to our virtual environment and write the code to initialize it in our application.
Add the Flagsmith SDK:
Add the Flagsmith initialisation code:
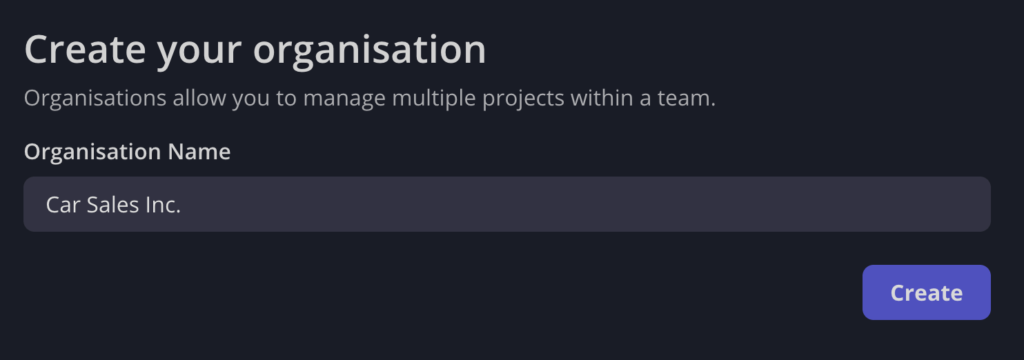
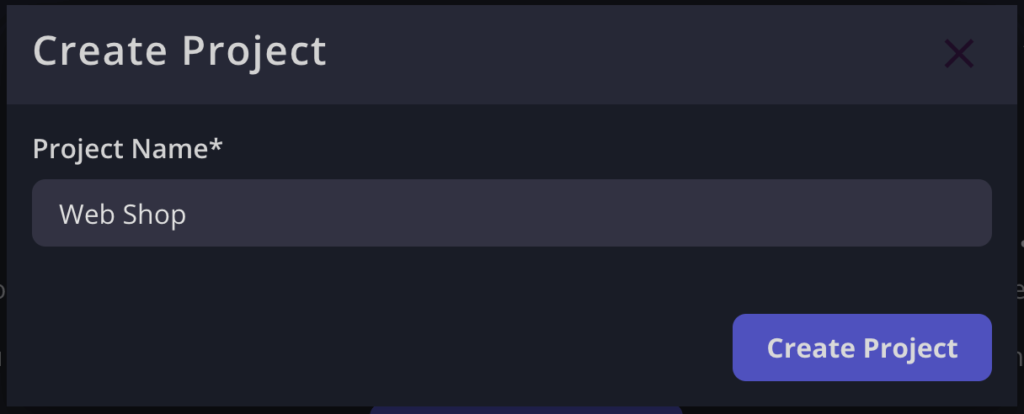
To get this code to work, we'll need to get an environment key. To do this, you'll need to create a free Flagsmith account. Once you’ve done that, you can create an organization and a project. As you can see in the screenshots below, I’ve created an organization named Car Sales Inc. and a project named ‘Web Shop’.
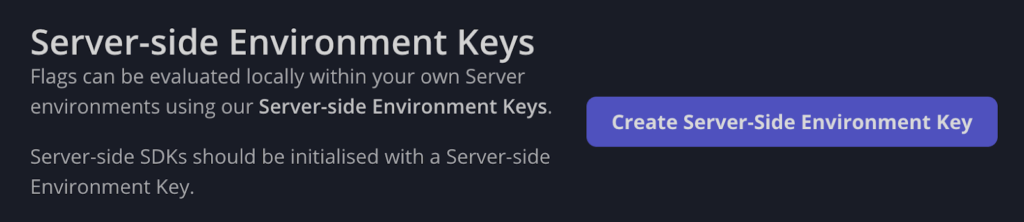
Now that we have a project set up, we should see that we have two environments already—Development and Production. For the rest of this article, I’m going to use only the ‘Development’ environment. To get started, we need to create a key to use in our Python application. To do this, navigate to ‘Settings’ under the Development environment and click on ‘Create Server-Side Environment Key’.
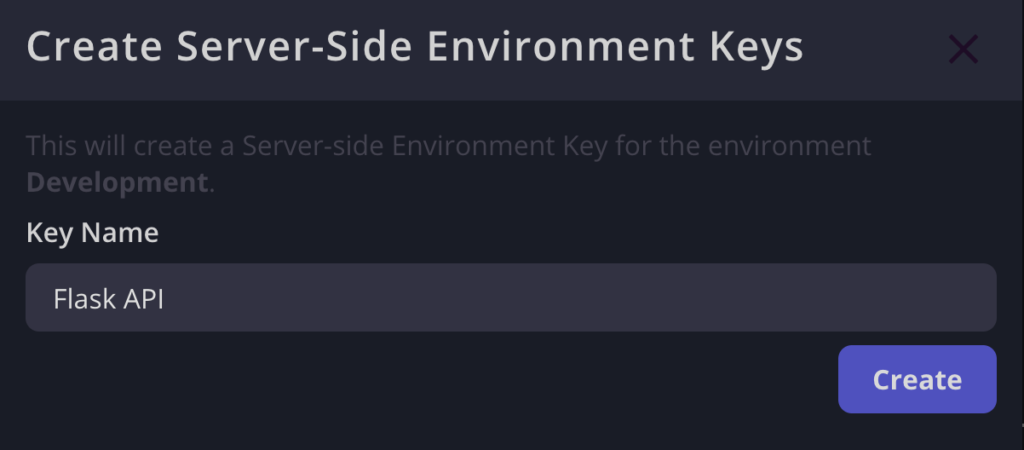
Once you click ‘Create’, you’ll see the key added to the list. Click the ‘Show’ button and copy the key. (Note: the key should begin with ‘ser.’). Now we can run our application with the following command to get it working with our newly initialized Flagsmith client.
Step 3. Using Python feature flags
Now that we have Flagsmith initialized, we can create a feature toggle in Python. Let’s start allowing our customers to purchase the games in our shop! We’ll first create a flag in Flagsmith to enable the shop functionality.
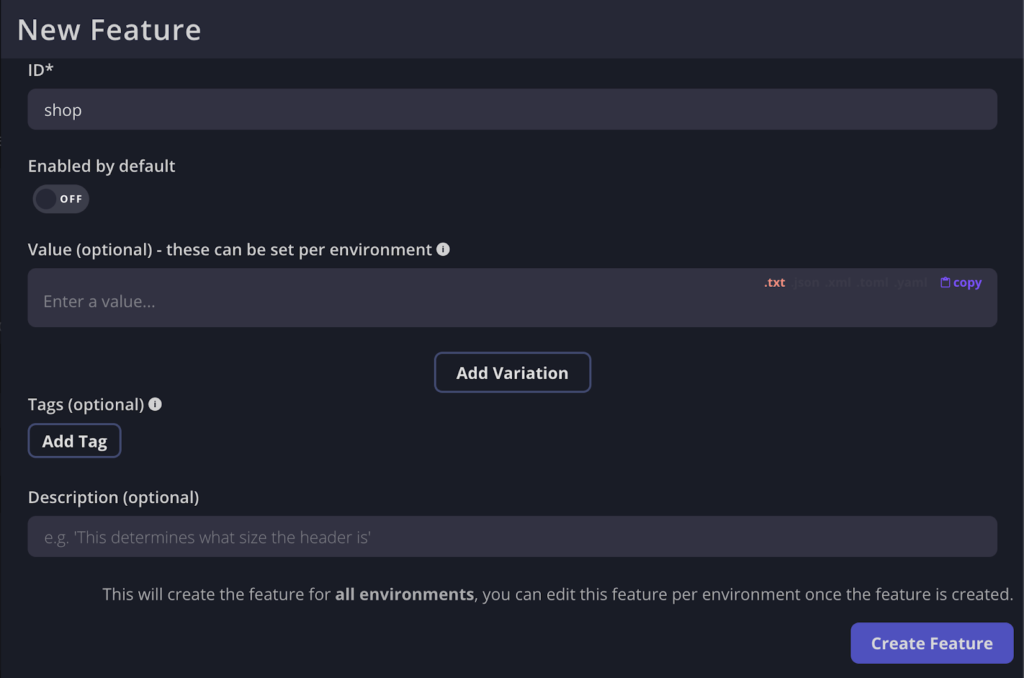
Note that I created this feature via my development environment, however, the feature lives at the project level. The values set when creating a feature are used as the defaults in all environments.
Now let’s add the logic to our Flask application to support the new feature. To do this, we’ll add a dictionary to maintain our inventory and create a new endpoint to buy a product.
Note that I’ve pulled out the flag name as a constant at the top of the module as per the following.
Now if we hit the new endpoint, we should see an error message saying that the shop is not yet available. I’ve added a screenshot below illustrating this using cURL:

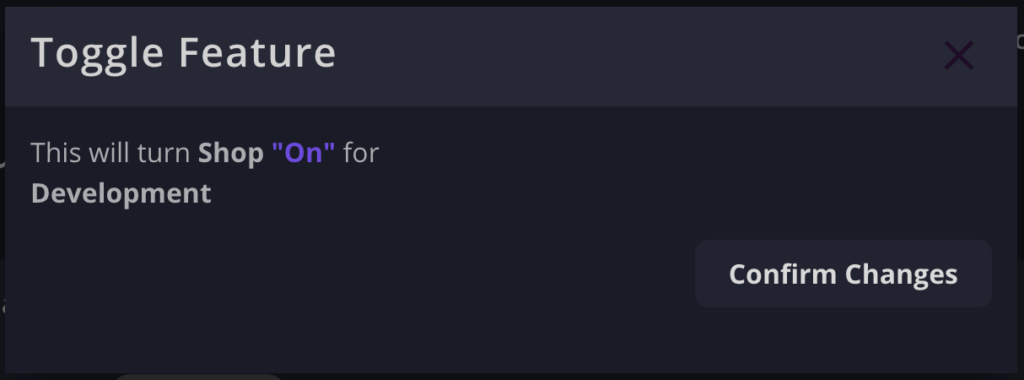
Let’s go ahead and enable the flag now in our development environment and test the new endpoint out.
Now when we hit the endpoint, we should see a successful response.

Step 4. Using remote configuration
We’ve seen the functionality to turn features on and off using Flagsmith, now we can extend our feature to allow us to remotely configure our shop. Let’s say we want to control the default sort of the games in our list. To do this, we’ll add some JSON metadata to our feature in the Flagsmith interface and use that value in the code. We’ll add a JSON object containing 2 keys to the value of our feature:
Adding this in Flagsmith should look something like this:

To use this in our code, we’ll update the list_games view as follows:
Now our games are listed in the order that we define in Flagsmith. If we want to change it to show the lowest prices first, we can just change the value to:
Step 5. Using local evaluation
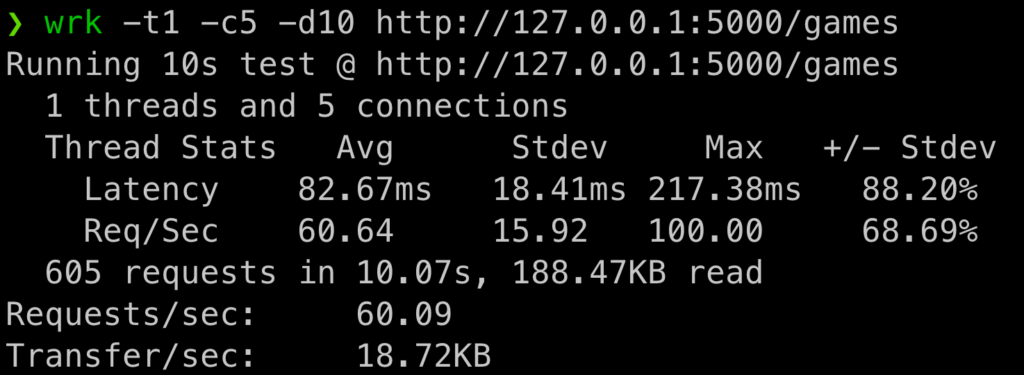
The implementation above uses remote evaluation mode to retrieve the flags. Whenever we make a call to get_environment_flags, we’re making an API call to the Flagsmith API. This functionality is a good thing when we need to make sure that changes made in Flagsmith are reflected immediately in our application, however, it introduces additional latency as we’re making an additional API call whenever a user hits our own endpoint.
Flagsmith offers a secondary option for this, local evaluation, which means that flags are evaluated by the SDK itself using information that it keeps up to date by polling the Flagsmith API in a separate thread.
More information on this topic can be found in our SDK documentation. To use local evaluation in our code, all we need to do is add the enable_local_evaluation argument when initializing our Flagsmith client.
Here you can see some indicative performance tests when using remote evaluation vs local evaluation.
Remote evaluation:
Local evaluation:
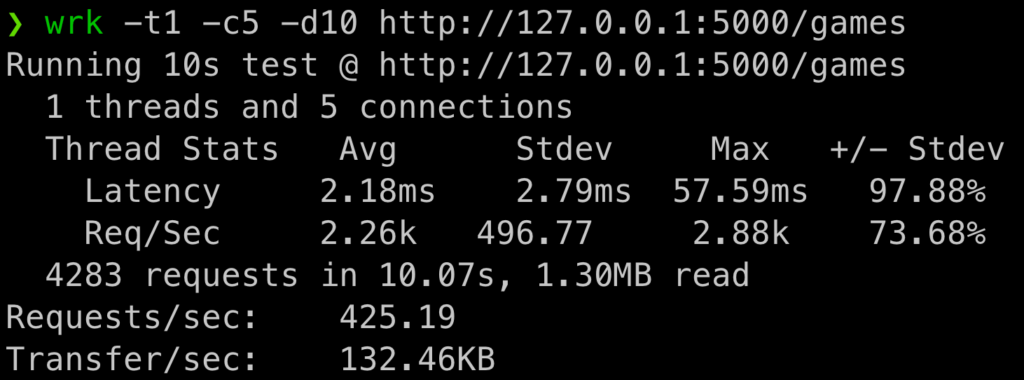
You can see that when we enable local evaluation, the latency drops hugely since we’re not making the additional call out to the Flagsmith API. When we enabled local evaluation, we were able to handle 425 requests a second vs. 60 when using remote evaluation.
Python feature flag best practices
Now that you've seen how to implement feature flags in Python, from setting up a virtual environment through to local evaluation, let's take a step back to look at how to keep your flag configuration clean and maintainable as things scale up.
Give your flags clear, consistent names
In Step 3 above, we pulled the flag name out into a constant (SHOP_FLAG_NAME = "shop"). That's a good habit.
As your Python application grows and you accumulate more feature toggles, vague or inconsistent naming becomes a genuine headache.
Use names that describe what the flag does and, where possible, include the context—something like shop_enabled or games_sort_remote_config. Anyone reading your new code should be able to understand the flag's purpose without digging through a configuration file.
Initialise flags at application startup
Rather than calling get_environment_flags() deep inside individual functions, consider fetching and caching your flags at application startup where your use case allows.
This best practice is especially relevant if you're using remote evaluation mode, where each call makes a separate API request. As we saw in Step 5, switching to local evaluation dramatically reduces latency (425 requests per sec vs. 60) because the SDK handles flag values internally rather than making an outbound call on every request. If low latency is a priority for your Flask application, local evaluation is the right choice.
Use flags to protect incomplete features, not just completed ones
One of the most powerful uses of feature flags in Python is wrapping new code that isn't finished yet. Rather than sitting on a long-lived branch, you can merge your work-in-progress into the main branch behind a flag that's switched off.
This step keeps your development environment clean, reduces merge conflicts, and means your Python app is always in a deployable state. Think of a flag as a conditional statement with a remote control—you decide when the feature is ready to expose to your user base, not your branching strategy.
Clean up flags you no longer need
This is probably the most overlooked aspect of implementing feature flags. Every flag you define adds a layer of conditional logic to your application's behavior. Over time, flags that have served their purpose but haven't been removed accumulate into technical debt: dead code paths, redundant configuration objects, and flag values that nobody is sure are still needed.
Build cleanup into your workflow, so when a flag has been at 100% for a reasonable period and you're confident in the rollout, remove it. Your codebase and everyone using it will thank you.
Separate your flag configuration from your application logic
Avoid scattering flag checks throughout your application without structure. A common approach is to centralise the logic that fetches and interprets flag values, so the rest of your Python application only ever interacts with a clean interface.
In our example, calls to flagsmith.get_environment_flags() sit at the route level. That separation makes it easy to swap out or extend your flag configuration without touching unrelated parts of the code.
Conclusion
Now you can get started with feature flags in Python! We’ve walked through the steps to integrate Flagsmith into a basic Python application so you're ready to get started.
As a caveat, this article focused only on using Flagsmith without identifying users. With identified users, we can start to bring in user segmentation, user overrides, and multivariate features. You can find more details about identities in our documentation.
If you want to start using Flagsmith as your Python feature toggle software, just create your account here or contact us for the on-prem solution.
More reading
If you like this Python feature flag guide, you can check out our guides for feature flagging with other languages and frameworks:
- Angular feature flags
- Java feature flags
- Ruby feature flags
- JavaScript feature flags
- Flutter feature flags
- NodeJS feature flags
- Spring Boot feature flags
- PHP feature flags
- Golang feature flags
- Kotlin/Android feature flags
- React Native Remote Config
- Swift feature flags
- .Net feature flags


.png)
.png)

.png)

.png)


.png)


.png)


.webp)