
Angular Feature Flags: a Step-by-Step Guide with a Working Application


In this guide, we'll walk through tangible ways to use feature flags in your Angular applications. As an example use case, you'll learn how to use Angular feature flags to control the rendering of a search UI feature in an insurance package selector component.
What is Angular?
Angular is a TypeScript based web development framework, released in 2016. Its predecessor, AngularJS, was the first single-page application (SPA) framework. Angular is developed by Google and it is still a popular choice for developing web applications compared to its competitors.
Angular helps web developers create dynamic web apps. It replaces traditional JavaScript development with an opinionated framework that provides high-level solutions for important tasks like data binding, state management, client-side routing, dependency injection and others.
The framework has come a long way in its 9 years of existence and introduced exciting new features that make Angular developers more and more efficient.
One of the big changes is standalone components, which aim to streamline the authoring of Angular applications by reducing the need for NgModules.
Another amazing addition is signals, which provide a simplified reactive state management alternative to RxJS.
Now, let's cover a little bit on what feature flags are and how to best use feature flags in Angular applications.
What are Feature Flags?
Feature flags are software development tools that enhance your team's development workflows. Feature flags let you separate deploy and release to make changes to products faster and continually deploy with lower risk. Feature flags are a great lever for things like phased rollouts, kill switches, canary releases, and A/B testing. If you're new to feature flags, we have a feature flags best practices guide that covers things like cleaning up old flags, naming conventions, etc.
Let’s get coding!
Prerequisites
Before we dive deeper into the code, below are some requisites to be familiar with:
- Some prior knowledge of JavaScript, TypeScript, and Angular will be essential. For this guide, you will use Angular 19.
- To follow the tutorial, you need to have NodeJS installed with a version that is compatible with Angular 19
- A Flagsmith account is used to create and manage a simple feature flag as part of the tutorial. Set up a free account now.
Now let's get our hands dirty with the code.
Example Angular App
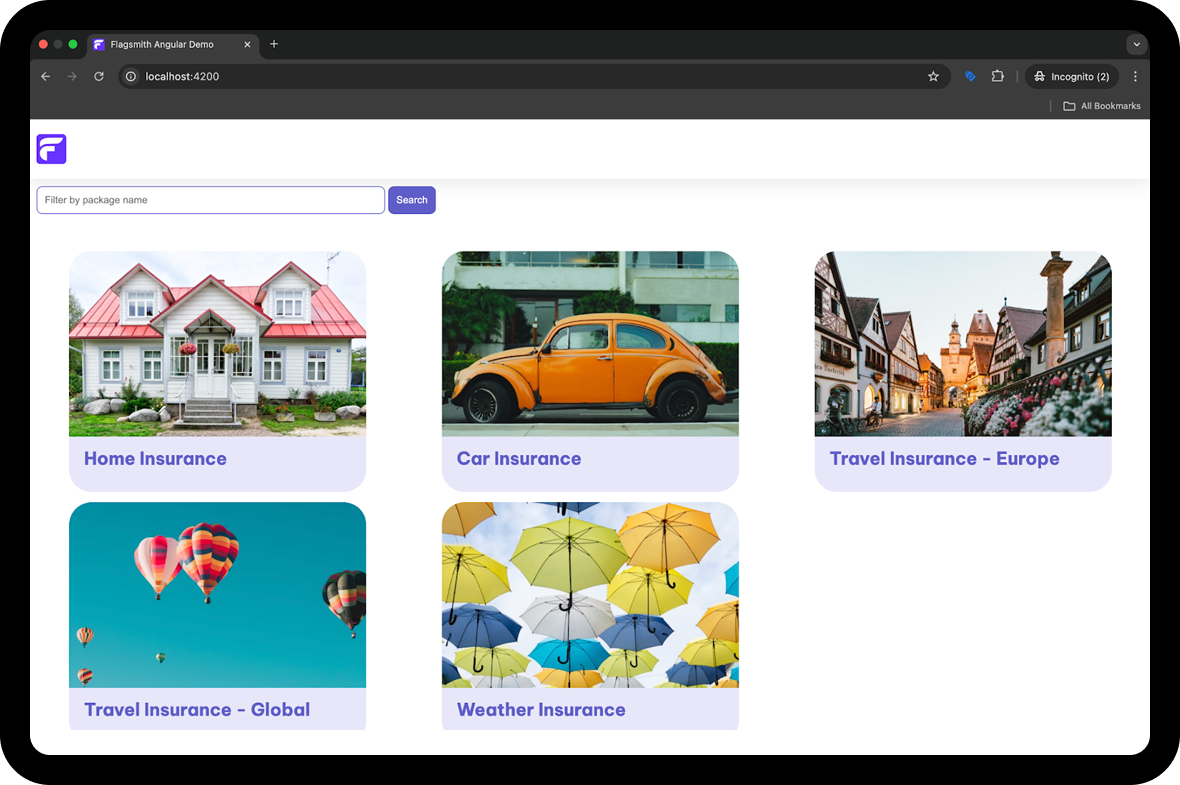
For this guide, you will clone a simple application based on Angular’s tutorial. It is a basic package selector for an imaginary insurance company. You can list and search the different packages the company offers.
For our feature flag example, we will add a feature flag to the package search input and button, which can be hidden or shown by disabling or enabling the feature flag on the Flagsmith interface.
The package selector looks like this when you run it locally:
The full code is available as a GitHub repository for your reference. To get the above app running locally, you can run the following commands:
git clone git@github.com:flasgmith/angular-demo.git
cd angular-demo
npm install
npm start
First, you clone the app from GitHub then you go into the directory. After that, you install the NPM dependencies with npm install, then you run the app with npm start which will show you something like the below:
Subsequently, if you hit http://localhost:4200 on your browser of choice you will see the app working.
The goal of this tutorial is to enable you to add a feature flag for the search feature. The search input and button can be hidden or shown by disabling or enabling the feature flag on the Flagsmith interface. Toggling the flag doesn’t require any code changes or any deployment/release process.
Set up Flagsmith for feature flags
To create the Angular feature flag to show or hide the search UI, you will first create a project in Flagsmith. To create a project you will click the “Create Project” button after signing up and logging in to Flagsmith:
You are naming your project “angular-package-selector” to keep things simple. Then you will reach a page as follows:
On this page, you will click the “Create Feature” button found at the top of the page. It will open a form as seen below:
You will fill in the “ID” of the feature flag, which is search in the above picture. Consistent naming is one of the feature flags best practices. This is a boolean feature flag that is either on or off so the value is not necessary. As the name suggests, this feature flag is used to show or hide the search input and button on the Angular app. Adding a description will be helpful for future reference, and add tags if you think they will be useful later.
When the feature flag is created, it will look like the below:
You have created the feature flag named search and it is in an enabled state. Notice that the feature will be created in both the Development and the Production environments. For the scope of this tutorial, you will only use the Development one. In the next section, you will install the Flagsmith JavaScript client, then integrate it with the Angular app.
Add Angular feature flag to the app
You have done the setup to add the feature flag to show/hide the search feature on the Flagsmith Web UI. Now you will need to add the SDK and the supporting code to use the feature flag in the application. To do this, first, you will add the Flagsmith JavaScript client from NPM by executing the following command on the project root:
npm install flagsmith --save
After the flagsmith client has been installed, you will first create the feature flag service which will load the client and check if the feature is on or off. The service is described next.
Create Angular feature flag service class
You will create the feature flag service class with the npx ng g s feature-flag command. It will communicate with Flagsmith using its client to find out if the search feature flag is on or off. The code for this feature flag service looks like the below:
First, you import injectable from Angular core which is used to make sure the FeatureFlagService class can be injected into any class that uses it as a dependency. Please read about Dependency Injection in Angular to grasp the concept better. Next, you import the flagsmith client from flagsmith. After that, you initialize the Flagsmith client with your environment ID.
To store your Flagsmith environment ID in environment.flagsmithEnvironmentId create Angular environment files with the npx ng generate environments command. This should be the content of the generated environment.ts and environment.development.ts files:
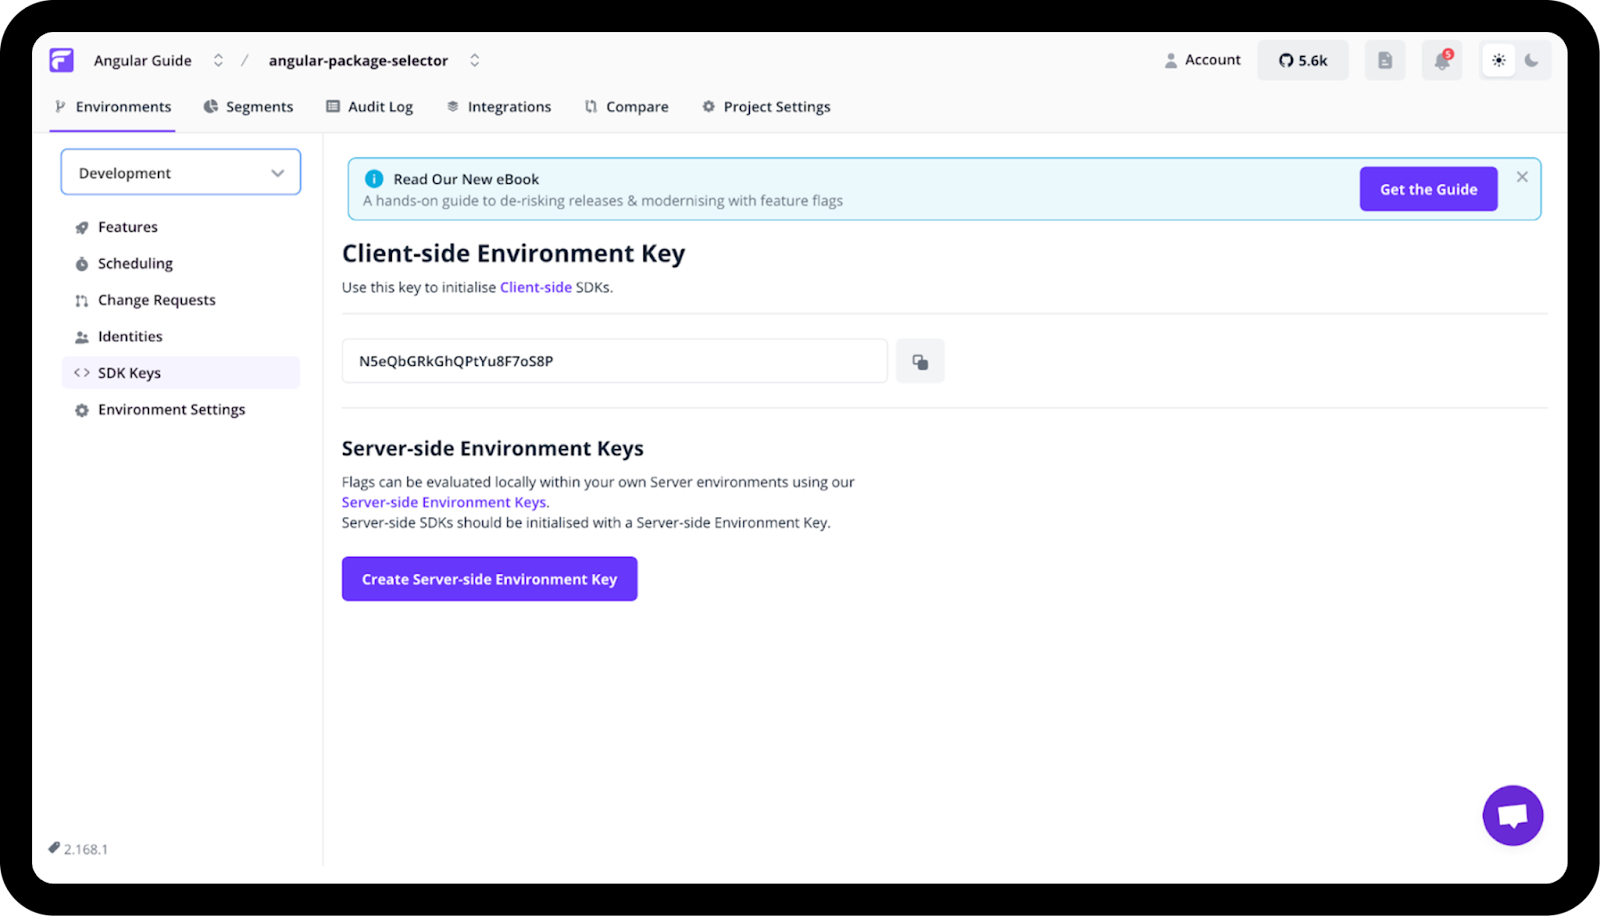
Your environment ID can be found in the “SDK Keys” section of your project in the Flagsmith dashboard with the name “Client-Side Environment Key”:
In this tutorial, we’ll only use Angular’s development mode, so you only need to replace the environment ID in your environment.development.ts. For a production application, you can set your Flagsmith production environment ID in the environment.ts file. Flagsmith Production environments are initialized with caching on and analytics off.
Since loading the current value of a feature flag requires an API call, we need a way to emit the current value of a feature flag to notify interested components/directives/services about the change. To achieve this, the service defines a WritableSignal named featureFlags. To learn more about signals, read Angular’s guide.
To have proper typing for the feature flag ID, we defined a helper type:
export type FeatureFlag = "search";
We can extend this type if we add a new flag in the Flagsmith dashboard.
The flagsmith SDK allows us to provide default flag values. We can get the current value of a boolean flag with the hasFeature method. The onChange handler is called any time the value of a flag changes.
Angular feature flag directive
With the FeatureFlagService ready, we can easily start using feature flags in our Angular components using the ngIf directive.
However, if we want to take it one step further, we can create an attribute directive that can show/hide an HTML template based on a feature flag value. To create the directive, run the npx ng g d feature-flag command and copy the following content:
You can find the selector of the directive inside the @Directive decorator, appFeatureFlag in this case. You can add this attribute to any of your HTML templates to activate the directive (we will show this part a bit later in the tutorial).
The directive has two inputs, both are signals. One, whose name is the same as the selector of the directive, is where we can provide the name of a Flagsmith feature flag.
The other one is an optional value, the HTML template will be displayed if the flag’s value matches this value. The default is true, you can override this if you want to show content if a flag’s value is false, or if you’re using non-boolean feature flags.
In the directive’s constructor, we create a signal effect that runs any time the signals used inside change. If the template should be visible, the createEmbeddedView function is called, otherwise, it's cleared.
The effect is automatically cleaned up when the directive is destroyed.
The inject method uses Angular’s dependency injection system to initialise the variables.
Wire up the directive with the package selector component
To glue up the service and directive with the package selector component, you will add them to the home component. Since Angular 19 generates standalone components by default, you only need to modify the src/app/home/home.component.ts file to achieve this:
The custom directive you defined earlier with the attribute appFeatureFlag is used on the section element that wraps the search input and button. Since this is an attribute directive, we use the * syntax. The feature name is passed as 'search' which is the same as the ID you defined in the earlier stage using the Flagsmith dashboard. Since the directive expects the flag’s ID in an input named as the directive’s selector (appFeatureFlag), we can use this simplified syntax: appFeatureFlag="'search'". The single quotes around the name are important! Since we defined a helper type for flag IDs (FeatureFlag), you’ll get a compile error if you make a typo in the flag’s ID.
In the next section, you will test that the functionality of the Angular feature flag works as expected.
Test the Angular feature toggle change
To test the feature flag, you can change the settings in the Flagsmith dashboard. As the feature toggle is in the “On” state the search UI will show up initially.
When you turn off the toggle and refresh the page the search UI will then disappear.
Note that you might need to wait a couple of seconds and it might take a couple of refreshes for the change to take effect. It is also the case because the caching of flags is turned on in the client configuration.
If you want to show the search UI when the flag is off, you can change the code like this:
All the code to add the Angular feature flag with the Flagsmith client is available as a pull request for your reference. In the next section, you will learn about further steps for feature flags for Angular.
Next steps and more options for your Angular feature flags
In addition to boolean flags, you can use feature flags with values. For instance, you could control the colour of the “Search” button with a feature flag that has the value of the colour like blue, light blue, or dark blue, without having to redeploy your app. There are a huge number of possible feature flagging use cases. Angular feature flags can help with things like customer segmentation and phased rollouts, canary deployments, A/B testing, and more.
You can also integrate Flagsmish feature flags into your Node.js backend following our Express guide. If you’re using React, you can check out the JavaScript guide.
In case you’re not using dependency managers like npm, you can import Flagsmith via CDN:
Why Use Flagsmith for Feature Flags?
Flagsmith is a feature flag service built to help you roll features out more efficiently and deploy changes to products faster. It's highly intuitive to adopt, which lets you support your team in changing your development process to bring products to market faster. Deploy Flagsmith and get started in minutes. Adopt modern development practices and move to continuous deployment to release more frequently.
Flagsmith offers open source feature flags and flexible deployment options (it can be hosted on-prem or on your private cloud). Check out the open-source version to give it a try or look into the code.
Conclusion
In this post, you learned about Angular, the first Single Page Application (SPA) framework. Then you were introduced to getting started with a simple Angular insurance package selector app which you could run locally. After that, you set up a feature flag to show or hide the search UI. Finally, you integrated the Flagsmith feature flag in the Angular app using a new service and a directive.
This is just one way you can use Angular feature flags. Flags can help you deliver value faster in a huge number of ways, from phased rollouts to segmented releases to testing in production, and more.
Feature flags help you release software with a high degree of confidence since you can turn a feature on or off in a matter of clicks when it's wrapped in a flag. There's no need to change or deploy any new code, which brings down the risk level significantly.
Get Started with Angular Flags and Flagsmith
To start using Flagsmith for feature flagging in Angular, just create your account here or contact us for the on-prem solution.
More Reading: Feature Flags and Other Languages/Frameworks
If you like this feature flag Angular guide, you can check out our documentation or read some of our other language/framework guides:
- Java feature flags
- Python feature flags
- Ruby feature flags
- JavaScript feature flags
- Flutter feature flags
- NodeJS feature flags
- Spring Boot feature flags
- PHP feature flags
- Golang feature flags
- Kotlin/Android feature flags
- React Native Remote Config
- Swift feature flags
- .Net feature flags


.png)
.png)

.png)

.png)


.png)


.png)


.webp)